Modify Windows Start Menu
The Windows 11 Start menu has had several updates. One of the biggest is deleting the Live Tiles used in Windows 10’s Start menu. [To open the Start Menu you may click on the Windows icon in the taskbar or press the Windows key on your keyboard].
The updates may look very different, but you can still change how it appears and functions. The Start menu can be opened by clicking on the Windows icon in your taskbar or by pressing the Windows key on your keyboard. You may rearrange, delete or add additional icons. You can also group icons favorite icons into categories. The Start menu is comprised of five sections. “Search” “Pinned” “All Apps”, “Recommended” and “Profile Folders”
Presenting the modifications that can be made with all five in a couple of paragraphs can be a lot to take in. I recommend that you review just one of the five steps, practice it until you become familiar with the possible functions, and then review the next. There will be plenty of images to guide you through the process.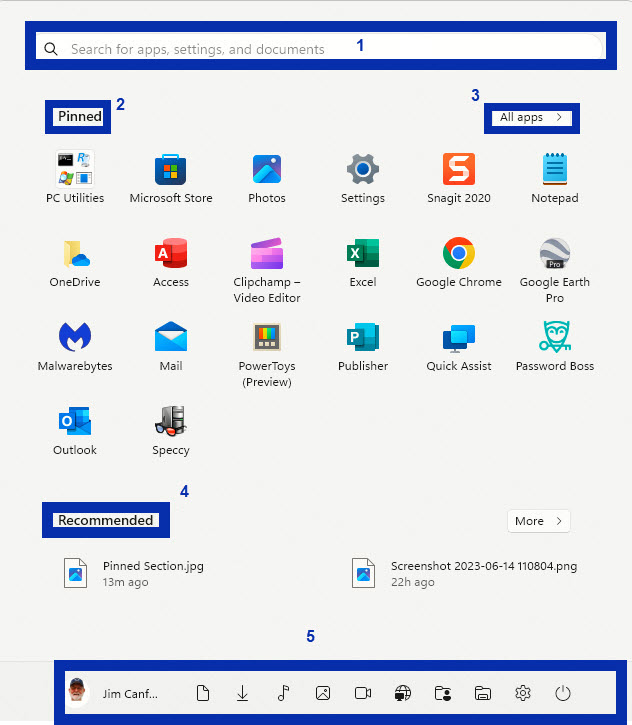
Search
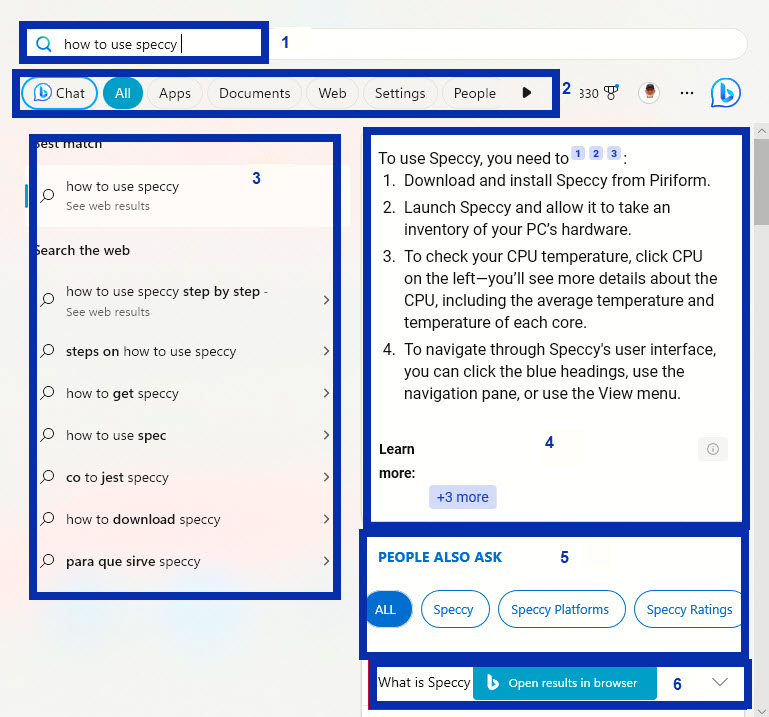
The current search feature now allows for both local computer and internet searches. In the first search, I just entered the name of an application on my computer. It displays it as the top item of the list and you may select it to open the app. However, if you enter the name of an app that is not on your computer it will handle it as a query and present it with a lot more options.
- Section 1 is the question I asked.
- Section 2 has “All” selected showing me all the results available.
- Section 3 will provide a list of the best internet matches.
- Section 4 will provide a quick list of steps to use the app. As you can see there are 3 additional explanations offered.
- Section 5 shows similar questions people ask about this app.
- Section 6 will open the Edge Browser and display results with much more detail.
Pinned
The Pinned section is just under the search bar of the Start menu and consists of the icons that represent a small portion of all your system applications. 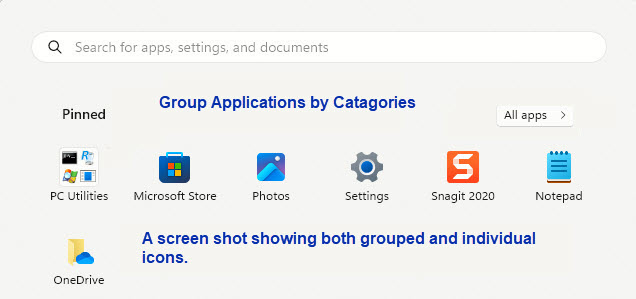 Windows’s goal was to present you with a small group of pinned apps, so you are not overwhelmed with the total number of apps on your system. But that does not mean it will look how you want it to. Changing just about everything with the start menu is doable. One exception is you must have at least four apps pinned or Windows will add some.
Making changes is straightforward. Icons may be removed, moved added, or grouped.
Move an Icon: To move an icon to any position. Left-click on the icon and drag and drop it to your preferred location.
Remove an Icon: To remove an icon in the Pinned section right-click on the icon and select “unpin from Start” It will remain on your system but no longer display as a pinned app.![]()
Add an Icon: To add additional icons the easiest way is to click on the “All Apps” section of the Start menu. It will open an alphabetical list of the applications on your system. Right-click on an application name and select “Pin to Start”.
Group Icons: Adding icons to a group is similar to moving an icon. Left-click any icon and drag and drop it on top of another icon you wish to group it with. It will create a new box containing the two icons. Name the group so it will be easier for you to know what it contains.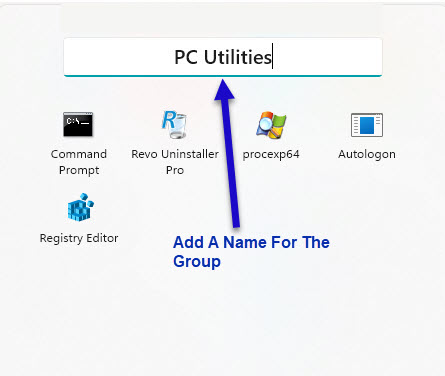 You may continue to drag and drop similar icons into this box. Whenever you wish to remove an icon from the group, left-click on the icon and drag it back to the Start Menu.
All Apps
This section is very similar to the list in Windows 10. It is a way to access the available applications on your system. Tip: Instead of scrolling through the entire list of applications to get to “Photos” you may click on any alphabet letter and it will open a shortcut window. Click on “P” and it will automatically jump to make “P” the first list of items.
Recommended
The list of items under the Recommended may contain any file or application that was recently used. If you just opened a .jpg file Windows will make the assumption you may wish to access it again. To aid with this they add it to the Recommended section of the Start menu. However, if you do not wish to see any recommendations on the Start menu they are easy to turn off.
Enter “Settings” in the search area of the taskbar.![]()
In Settings select>Personalization >Start > and turn off the toggle switch on “Show recently opened items in Start, Jump Lists, and File Explorer”. The Recommended area will remain but will no longer be populated by recommendations.
Profile Folders
The Profile section of the Start menu displays your profile name and the ‘Power” icon in its basic setting. You may choose to include several additional folders that will make accessing them easier. Knowing where to quickly access some of your most used functions like Settings, Pictures, Network, etc. can help you make changes quickly.
To change this area go to Settings >Personalization >Start >Folders.
Addition Modifications
In addition to the modification that can be made as discussed earlier. Windows also lets you prioritize the areas that are meaningful to you. You can choose to display more pinned items. Have a balance of pinned and recommended or display fewer pinned items and display more recommendations. Just open Settings > Personalization > Start and choose the version you wish to use.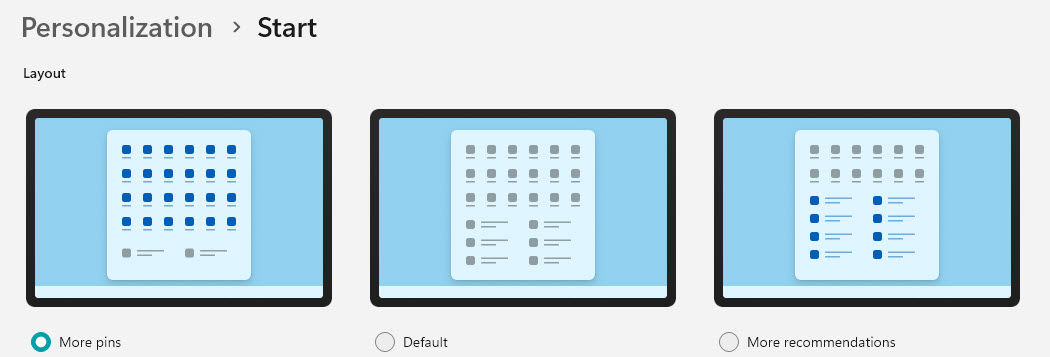
Summary
Making the Start menu look the way you want it to can speed up the way you access applications. The menu is a far cry from the boxes style used on the Windows 10 Start menu and perhaps you wish it stayed that way. If you do you can fix that as well. Making the Windows 11 Start menu mimic the Windows 10 Start Menu is slightly more difficult but the finished menu will look and feel like Windows 10.